- Print
- DarkLight
- PDF
Completing NFM part 2
- Print
- DarkLight
- PDF
Completing the New Faculty Member form page 2
Step 5: Entering Personal Data
To enter the new faculty member’s personal information:
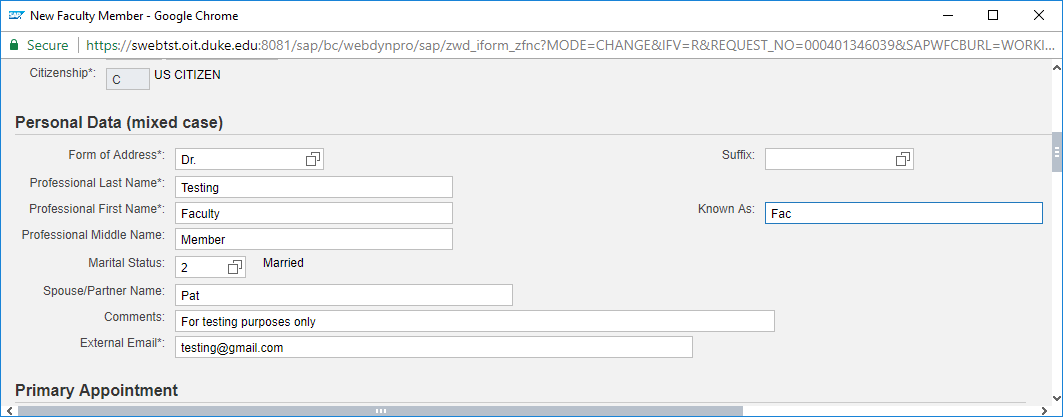
1. Select a form of address from the drop-down (required).
Frequently, “Professor” is used for all faculty except those in the schools of Medicine and Nursing, who typically use “Dr.” If unsure, check with your dFac administrator.
2. Enter the professional first, last, (both are required) and middle names.
The professional names should reflect the faculty member’s name as shown on the CV or contract letter.
3. In the Known As field, type the faculty member’s preferred or informal first name.
4. Select a marital status and the spouse or partner’s name. These fields are optional and can be added later.
Questions about marital status or partner name? Contact Faculty Affairs Administration.
5. Comments can be added, for example, notes about waiting for additional information, location of formal paperwork in the organization’s document storage system, or brief synopsis of why the form is being submitted. Be aware that comments may be visible to many people within Duke, including faculty, so comments should be professional and relevant.

Step 6. Creating the Primary Appointment
All faculty must have a primary appointment. To create the primary appointment:
1. Verify the primary appointment organization.
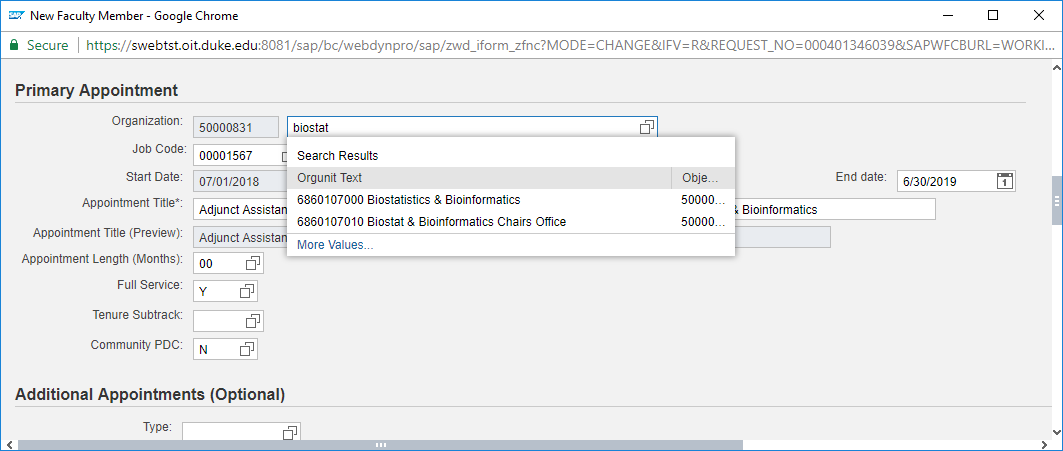
In most cases, the primary appointment organization matches the position organization. If you need to change the organization for the primary appointment, type either the BFR code or organization name/description in the Organization entry field. As you type, a drop-down list of matching choices appears. Select an organization from the list.
You’ll need the exact name of the organization as described in SAP. For more information about BFRs and descriptions of the organizations to which you have permissions, contact your organization's SAP Security Initiators or iForms users.

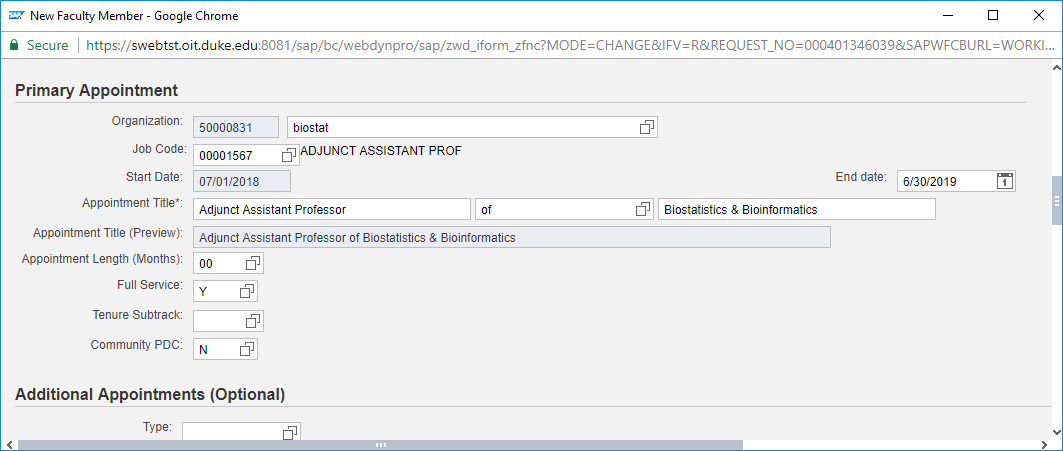
2. Verify that the position job code is also correct for the appointment.
In most cases, the primary appointment job code matches the position job code. To change the job code, display the job code drop-down list and select another job code. Only faculty job codes will be displayed.
3. Verify the Start Date is the same as the effective date entered previously on the New Faculty Member form.
To change the Appointment Start Date, you must change the effective date; these two dates must match.
4. Enter an End Date for the primary appointment.
You can type an end date or select one using the calendar tool. If the new faculty member has a contract, this will be the contract end date. Only tenured appointments do not have contracts.
Questions about Appointment Start or End Date? Contact Faculty Affairs.
5. Specify the primary appointment title, such as “Professor of Business Administration.”
The title is built from the three Appointment Title fields. You can edit the default job code description and organization description, if needed, and choose a connector in the drop-down list. Press Enter in the Appointment Title field to update the title in the Preview field. Appointment titles should be appropriate for the job codes, i.e. NRR modifiers such as 'Adjunct' or 'Visiting' should not be removed.
Click the Appointment Title (preview) field to see the title as it is built with the title field selections.
Remember! Specify the appointment title exactly as it appears on the contract or appointment letter. All titles must be in the initial case, not in all caps. The appointment title entered here will appear on reports, letters, Board of Trustee lists, and will be fed to other systems.
Any professorships awarded at the time of hire are input separately from the primary appointment title.

6. Choose a value for appointment length. This may or may not correspond with the Appointment Start or End Dates. If unsure, check with your dFac administrator.
Appointment Length Value | Definition |
Less than 9 months | Common for appointments spanning only one semester. |
9 months paid over 12 months | Most common for campus faculty, consists of an eight-month core which corresponds to the academic calendar established by the president each year (usually September through April) |
10 months paid over 12 months | Uncommon. In cases where duties are to be assumed prior to September, arrangements may be made for the appointment to begin in July or August. The formal appointment letter provided for the provost's files must accurately reflect the appointment date. |
11 months paid over 12 months | Uncommon. |
12 months | Most common/default for clinical SOM/SON faculty. Most faculty members in the Medical Center are on twelve-month appointments that resemble the twelve-month appointments of university staff. |
Other | Rare. |
7. If the faculty member has a reduced work schedule, select “No” in the Full Service drop-down list. Otherwise, leave “Yes.”
8. (Optional) Enter a subtrack for faculty hired within the School of Medicine (SoM). For more information about subtrack options, contact the SoM APT office
9. (Optional) If the new faculty member will be a Community Private Diagnostic Clinic faculty member, enter Y in the dropdown. For more information about CPDC faculty, contact the SoM APT office.
Step 7: Creating Additional Appointments (Optional)
Some faculty members are given secondary, joint, or administrative appointments when they are hired. The New Faculty Member form lets you enter all of the new appointments at the same time. Faculty can have multiple secondary appointments. Leveraging the Titles form allows for a hierarchal organization of secondary appointments if needed.
To create the new faculty member’s additional appointments:
1. In the Additional Appointments section, select an appointment type.
2. Type the secondary organization’s name or BFR in the Organization entry field. As you type, a drop-down list of matches appears for you to select an organization from the list.
3. Select the job code from the job code drop-down list.
Note: For administrative appointments, you must select an administrative appointment type rather than a job code.
4. Specify the appointment title using the three Appointment Title fields. Be sure the title is in the initial case rather than in all caps. Appointment titles should be appropriate for the job codes, i.e. NRR modifiers such as 'Adjunct' or 'Visiting' should not be removed.
5. Click the Add button to save the new appointment.
To create further additional appointments, follow the same steps.
To change something about the appointment you just added, you can select the appointment row, make your change and click the Update button. To delete the appointment you just added, select the appointment row and click the Delete button.
Step 8. Adding Degrees
All faculty must have at least one degree entered in dFac. Their highest degree must be noted, even if there is only one degree entered. Remember! This is required to meet SACS accreditation standards.
If the institution is not in the list, your dFac administrator may put in a ticket with dFac support to add it.
To add degrees:
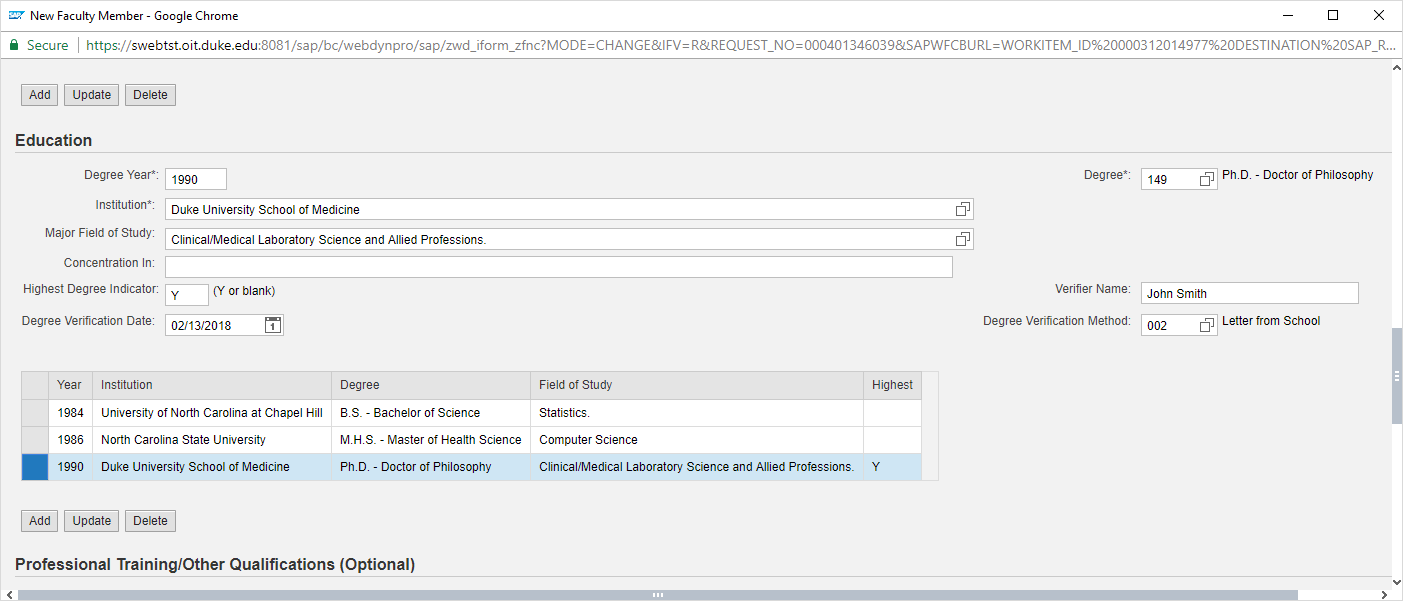
1. Type the degree year (required)
2. Type or select the degree from the drop-down list (required).
3. Begin typing the institution name. As you type, matching institutions will appear on the drop-down list.
4. Select the institution.

5. For the highest degree:
- Specify the major field of study, for example, “Biochemistry.”
As you type, matches appear on the drop-down list. Select the field of study that most closely matches the degree. If you cannot find an exact match for the degree, for example, “Orthopedic Surgery,” you may choose the general field, school, or department name, such as “Medicine.”
Remember! This data is necessary for SACS re-accreditation. If a Field of Study should be added to this list, contact dFac support.
- Set the Highest Degree Indicator to Yes on the line which lists the highest degree.
- Indicate the Degree Verification Method and Degree Verification Date.
- Type the name of the person who verified the degree.
6. Click the Add button to save the degree.
To add more degrees, follow the same steps.
To change something about the degree you just added, select the row and click the Delete button. Re-enter the training information and choose Add. The Update button should be used when updating a training that has already been approved.
Step 9: Adding Professional Training
If faculty have professional training such as fellowships, residencies, or professional certifications, enter them in this section. All professional training added here will be visible in Scholars@Duke.
To add professional training:
1. Type or select the start date and end date of the professional training (required).
2. Type and select the institution name.
3. Type the job title or training description (required).
4. Specify the department or organization, if applicable.
5. Include any additional notes in the Comments field. This field will not be visible in Scholars@Duke.
6. Click the Add button to save the training record.
To add more training records, follow the same steps.

To change something about the training you just added, select the row and click the Delete button. Re-enter the training information and choose Add. The Update button should be used when updating a training that has already been approved.
Step 10: Entering Contact Information
You’ll need to record the new faculty member’s current contact information so that they can be reached until the permanent contact information can be added at the time of hire. To add contact information:
1. Type the address into Address 1, City, State, and Zip (required).
Use the Address 2 field if a second address line is needed.
Note: Instead of entering a foreign address on a New Faculty Member form, enter the office address in the address section. The address can be edited after hiring. For any questions, check with your dFac administrator.
DKU Note: For Duke Kunshan University affiliates only, all types of addresses will be hidden in Scholars@Duke. and the Duke Directory.
2. Type the faculty member’s contact phone number into the Phone Number field, including the three-digit area code (required).
3. Select the faculty member’s work country, if other than the USA.
Adding Comments
Your school may request that you enter information into the Comments box at the bottom of the New Faculty Member form. Comments are not required, but some schools require general comments such as additional background information about the submission. Check with your school’s dean’s office to see what kinds of comments to enter.
Remember! Comments are stored permanently in dFac, so be careful not to enter sensitive or personal information in the Comments section.

